Regular servicing is the single best way to keep your sewing machine running smoothly and prolong its lifespan. Whether your machine is used daily or just for occasional projects, proper at-home maintenance can prevent costly breakdowns and frustration.
Why Sewing Machine Maintenance Matters
Sewing machines collect dust, lint, stray threads, and oil residue, especially around the bobbin, feed dogs, and throat plate. Left unchecked, these build-ups cause skipped stitches, noisy operation, and can even damage internal parts. Well-maintained machines sew more evenly and reliably, delivering better results and fewer headaches.
What You’ll Need
- Small screwdriver (usually provided with the machine)
- Soft brush or lint brush (old toothbrushes can work well too)
- Lint-free cloth
- Sewing machine oil (always use oil made for sewing machines – see oil recommendations below)
- Tweezers
- Your machine’s manual (for model-specific care)
Step-by-Step Guide
1 – Unplug and Prepare
Safety first: always unplug the machine before starting.
2 – Remove Needle, Presser Foot, and Thread
Take out the needle, presser foot, bobbin, and any thread so you can access all service areas.
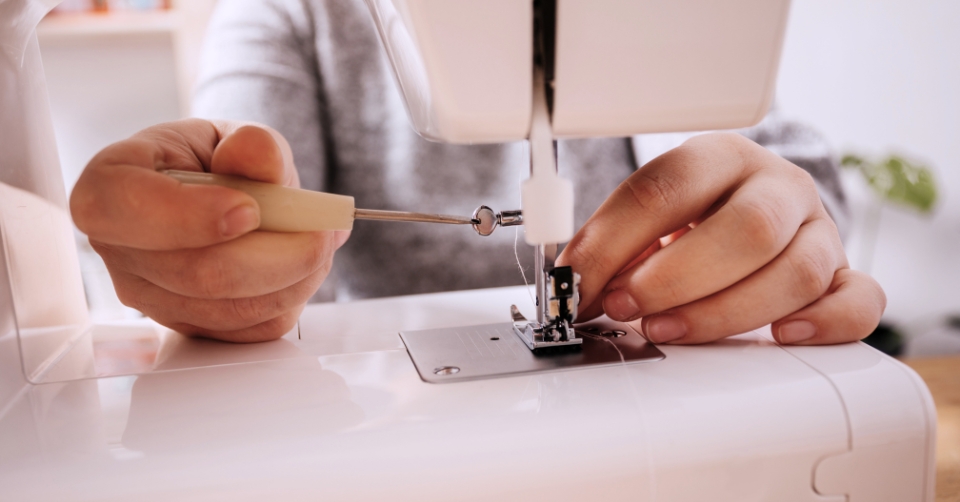
3 – Open and Access Interior Areas
Consult your manual to remove the throat/needle plate and bobbin cover using your screwdriver. Be careful to keep all parts and screws safe.
4 – Clean Out Lint and Dust
Use a soft brush – not canned air (it can push debris deeper) to gently sweep away all lint, dust, and fluff around the feed dogs, bobbin area, and thread path. Use tweezers for stubborn debris; a gentle vacuum can help if needed.
5 – Check and Maintain Metal Parts
With the throat plate off, inspect for grooves or nicks. Sand gently or replace the plate if damage is severe. A slightly bent plate can sometimes be tapped into place with gentle pressure.
6 – Oil the Machine (if required)
Not all modern machines require oil – always check your manual.
- If oiling is needed, use a top-rated sewing machine oil (such as Singer All-Purpose, Liberty Oil, Tri-Flow Synthetic, or Zoom Spout). Never use household or cooking oils!
- Place 1–2 drops on designated oil points – most commonly the shaft and hook race. Less is more: too much oil can attract lint.
- Move the handwheel to distribute oil, and sew on scrap fabric afterward to absorb potential residue.
7 – Check the Bobbin Area
Wipe clean. If the bobbin case is scratched or shows damage, consider replacing it for best stitch quality.
8 -Reassemble and Test
Reattach parts in the order you removed them. Insert a new needle, replace the presser foot, and wind the bobbin properly.
Test with scrap fabric to check tension and stitch quality before returning to regular work.
How Often Should You Service Your Machine?
- Light maintenance: Every 5–10 sewing sessions, or after finishing any large/linty project.
- Full service: Every few months for home sewists; more often for heavy users.
- Professional service: Once a year for an in-depth clean and tune-up, as recommended by most manufacturers.
Troubleshooting & When to Call a Pro
If your machine has tension issues, unusual noises, skipped stitches, or fabric feeding problems, follow all cleaning steps and check your manual for troubleshooting. If problems persist or if you see internal damage, it’s best to seek professional servicing or repair.
The Importance of the Right Oil
Use only clear, lightweight sewing machine oil (not household or car oils). Recommended choices include Singer All-Purpose, Liberty, Tri-Flow Synthetic (for heavy-duty or industrial machines), or Zoom Spout. Synthetic oils offer longer-lasting lubrication in high-use or demanding environments.
Extra Sewing Machine Care Tips
- Cover the machine when not in use to keep out dust.
- Change your needle regularly – dull needles cause skipped stitches and can damage your fabric.
- Never eat or drink near your machine; crumbs and liquids can get inside and cause issues.
By following these steps and best practices endorsed by experts and manufacturers, you’ll enjoy reliable, skip-free sewing and extend the life of your sewing machine for years to come. Happy stitching!