Sewing patterns are the foundation of garment-making and many other fabric-based projects. Whether you’re an absolute beginner or looking to refine your technique, understanding how to cut out and use a sewing pattern is a crucial skill that will set you up for success. This step-by-step guide will walk you through the entire process, from selecting the right pattern to transferring markings onto your fabric with precision.
Choosing the Right Pattern
Before diving into the sewing process, it’s important to choose a pattern that suits your skill level and project needs. Consider factors such as:
- Garment type and style: Are you making a dress, a top, or a home accessory like a cushion cover?
- Complexity: If you’re a beginner, opt for a pattern labelled “easy” or “beginner-friendly.”
- Instructions and clarity: Choose patterns with clear illustrations and step-by-step guidance.
- Sizing: Many patterns include multiple sizes, so ensure you pick one that aligns with your measurements.
Selecting the Correct Size
Sewing pattern sizes often differ from ready-to-wear clothing, so it’s important to always go by body measurements — not the size you’d usually buy in a shop. To find the right size:
- Use a flexible measuring tape to take accurate measurements of your bust, waist, and hips.
- Compare these to the pattern’s measurement chart, focusing on the key areas relevant to your garment.
- If your measurements fall across multiple sizes, cut the largest size that matches any of your measurements — this ensures it fits your widest point, and you can always adjust other areas for a better fit.
- Consider blending between sizes if needed, or toile (make a test version) for more complex garments.
Preparing Your Workspace
A well-organised workspace ensures efficiency and precision.
Before you begin:
- Find a large, well-lit area with enough room to spread out your fabric.
- Gather your essential tools: fabric scissors, pins, chalk or fabric markers, a cutting mat, and pattern weights.
- Keep an iron nearby to press fabric before cutting for better accuracy.
- Don’t forget to keep things tidy as you go – your future self will thank you!

Preparing Your Fabric
Fabric preparation is crucial for ensuring a professional-looking final product.
- Pre-wash and dry your fabric according to the manufacturer’s instructions. This helps prevent shrinkage after sewing.
- Iron your fabric to remove creases and ensure it lays flat.
- Check the grainline to ensure proper pattern alignment.
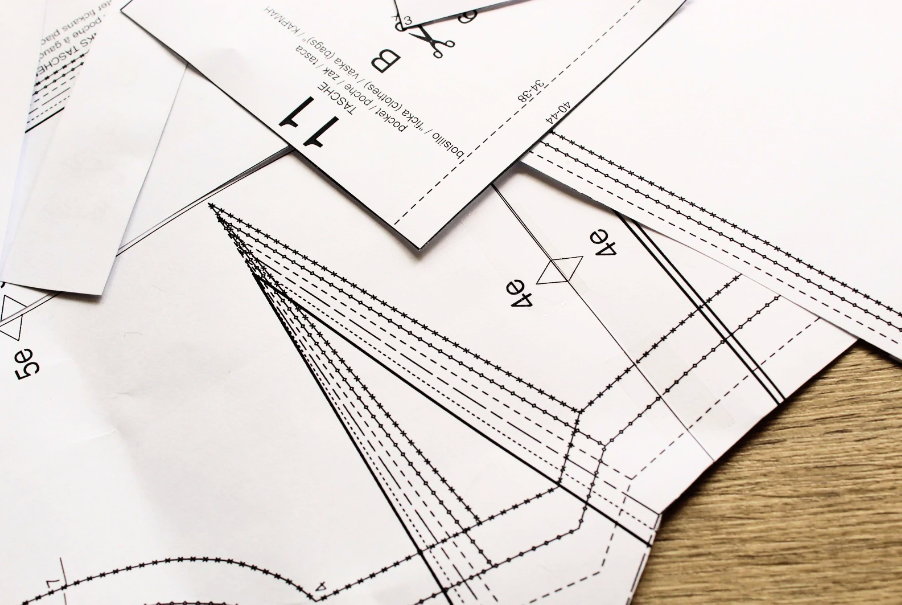
Tracing or Cutting Out the Pattern
Depending on your preference and the complexity of the pattern, you can either:
- Trace the pattern onto tracing paper to preserve the original and make alterations more manageable.
- Cut directly from the tissue paper pattern if you’re confident in the size and layout.
Always use paper scissors for pattern paper and fabric scissors for cutting fabric to keep both sharp and effective.
Laying Out the Fabric
- Lay your fabric flat on your workspace, ensuring it’s smooth and free of wrinkles.
- Pay attention to the grainline and nap (if applicable), following the cutting layout provided in the pattern.
- If using printed fabric, ensure that patterns align correctly and check your placement before cutting.
Pinning and Cutting the Fabric
- Pin the pattern pieces to the fabric according to the layout guide.
- Use pattern weights if you prefer not to pin through delicate fabrics.
- Cut carefully along the designated lines, using sharp dressmaker’s shears for precision.
- Take care around curves and notches, which are essential for accurate assembly.
Transferring Pattern Markings
Once cut, you’ll need to transfer important markings from the pattern onto your fabric:
- Use tailor’s chalk, fabric markers, or tailor’s tacks to mark darts, pleats, and other sewing guidelines.
- Double-check that all necessary markings are present before removing the pattern pieces.
Double-Checking for Accuracy
Before removing the pattern paper, verify that:
- All pieces are cut to the correct size.
- Notches and pattern markings are clearly transferred.
- The number of fabric pieces matches what is required for your pattern.
Keeping Your Pieces Organised
- Label them clearly – especially if they look similar: use chalk, washable pen, or pinned notes for markings like front, back, or sleeve (L/R).
- Store them together – in a large envelope, folder, or document wallet so nothing gets lost or creased before you’re ready to sew.
Sewing Pattern FAQ
What is the best way to cut out a pattern?
The best way to cut out a pattern is to ensure the fabric is flat and free of wrinkles. Secure the pattern pieces with pins or weights and use sharp dressmaker’s shears for clean, precise cuts. Always cut smoothly along the pattern lines and follow the layout provided in the instructions.
What sewing tool should I use to cut out my pattern?
The main tool for cutting a pattern is sharp dressmaker’s shears, designed specifically for fabric. Smaller scissors can be used for intricate cuts or notches, and rotary cutters with a cutting mat are an excellent alternative for certain projects. Ultimately, use what works best for you and produces the most accurate cut.
When cutting a pattern, do you cut on the line?
In most cases, you should cut directly on the line unless the pattern specifies otherwise. Most patterns include seam allowances, so following the designated lines ensures the correct size and proportions.
Mastering the art of cutting out and using a sewing pattern is an essential skill for any sewer. By carefully following these steps – choosing the right pattern, properly preparing your fabric, and cutting with precision – you’ll set yourself up for sewing success.
With practice, patience, and attention to detail, you’ll soon be creating beautifully tailored garments and projects with confidence.
Happy sewing!